
Remodeling guide
Homeowners: Dustless Tile Removal for $3–$7 Per Sq Ft

Dust-controlled tile removal is worth paying for if you’re renovating an occupied home, dealing with old thinset that could contain silica dust, or you simply can’t stomach a week of gray film on every surface. Expect to pay a fee per square foot for the service, with the payoff being a dramatic cut in airborne dust, not a total elimination of it. No contractor can honestly promise zero dust. Anyone who does is oversimplifying the physics.
TL;DR:
- Dust-controlled tile removal typically costs between $3.00 and $7.00 per square foot, with thicker thinset and cramped spaces pushing prices higher.
- Proper dust capture relies on HEPA-shrouded tools and industrial vacuum systems that significantly reduce airborne dust but cannot eliminate it entirely.
- Residual dust settling on surfaces is normal, especially with thicker thinset or challenging access, and silica exposure remains a health concern requiring proper controls.
- Hiring a professional becomes essential for jobs over 200 to 300 square feet or when occupants have respiratory sensitivities, as DIY may not achieve satisfactory dust containment.
- Contractors should provide detailed bids outlining equipment, disposal, and safety practices, while guarantees mostly cover substrate condition and clean-up, not complete dust removal.
Table of Contents
- What Does Dustless Tile Removal Cost Per Square Foot?
- How Does Dust-Controlled Tile Removal Actually Work?
- Is Dustless Tile Removal Really Dust-Free?
- Should You Hire a Pro or Try Dustless Removal Yourself?
- What Should You Ask a Tile Removal Contractor Before Hiring?
- How Long Does a Dustless Tile Removal Job Take?
- What Happens After the Tile Comes Up?
- What Warranty Should You Expect From a Dust Removal Contractor?
- What Payment Options Do Tile Removal Contractors Accept?
- How an Integrated Remodeler Approaches Dust Control
- Get an Estimate for Dust-Controlled Tile Removal
- Sources
- FAQ
What Does Dustless Tile Removal Cost Per Square Foot?
Most homeowners pay somewhere between $3.00 and $7.00 per square foot for professional dust-controlled tile removal, a range several industry providers report consistently for certified dust free tile removal. That band covers the equipment, labor, and disposal for a fairly standard job. It does not automatically cover everything a bathroom or a staircase might throw at a crew.
A handful of variables push bids toward the high end or beyond it:
- Thinset thickness and bond strength. Old mortar beds that were troweled on thick, or tile set with modified thinset that grips like concrete, take longer to grind out and cost more.
- Extensive grinding versus prying. Some floors pop up with a pry bar and minimal grinding; others require full mechanical grinding across every square foot, which slows the job and raises labor time.
- Stairs and tight bathrooms. Cramped spaces limit which tools fit, often forcing hand tools over ride-on equipment, which is slower and pricier per square foot.
- Access. A ground-floor room with a driveway next to it costs less to service than a third-floor condo with one elevator and a long hallway.
- Disposal and haul-away. Tile and thinset are heavy. Dumpster fees, truck loads, and dump tipping fees usually get added as a line item separate from the removal labor itself.
Get at least two quotes and ask each contractor to break the bid into removal labor, equipment/setup fees, and disposal. Bids that look suspiciously low often skip proper HEPA equipment or underestimate thinset difficulty, then tack on surprise charges once the job starts.
How Does Dust-Controlled Tile Removal Actually Work?
The core idea is capturing dust at the exact point it’s created, before it becomes airborne, rather than trying to contain a room full of dust after the fact. That distinction separates real dust-controlled systems from a contractor who just tapes plastic sheeting over doorways and hopes for the best.
A proper setup pairs a HEPA-shrouded power tool with an industrial vacuum rated for fine particulate. As the chipping hammer or grinder breaks tile loose, a shroud around the tool head connects directly to a vacuum hose, pulling dust into a sealed filter system before it can spread. Remove Right’s explainer on dustless floor removal notes that filters rated at 0.3 microns are what actually capture the fine silica particulate that matters for health, and that industrial-grade collectors significantly outperform a household shop vac running the same job.
Common tools you’ll see on a professional job include:
- HEPA-shrouded chipping hammers for breaking tile and thinset loose from the substrate.
- Grinders with dust shrouds for stubborn or thick mortar beds that won’t pop free with leverage alone.
- Ride-on scrapers for large open floors like great rooms or basements, where speed matters and ceiling height allows the equipment.
- HEPA air scrubbers running in the background to filter ambient air in the work zone, especially useful when occupants remain in the home.
For jobs where noise ordinances or a sleeping baby down the hall rule out grinders and hammers, some crews switch to leverage-based manual systems that pop individual tiles free with mechanical force instead of vibration or impact. These silent tile-lifting systems trade speed for quiet, and they tend to generate less airborne dust simply because there’s less mechanical agitation per tile.
Pro Tip: Ask whether the vacuum has an auto-clean filter feature. Systems without it require the crew to stop mid-job and manually clean clogged filters, which can release trapped dust right back into the air and slow the whole project down.
None of this equipment works on its own. A Dustkingz breakdown of dustless removal makes the point that crew discipline and filter maintenance matter more than any single piece of hardware. A trained crew that keeps the shroud sealed against the surface, empties the vacuum before it’s full, and manages containment doors correctly will outperform a crew with better equipment and sloppier habits.
Is Dustless Tile Removal Really Dust-Free?
No method removes tile with zero dust. What “dustless” actually describes is a significant reduction in airborne particulate compared to a sledgehammer-and-shovel approach, not a literal absence of dust in the room.
A well-run HEPA source-capture system captures the large majority of dust generated during removal, according to the same Dustkingz analysis, but some residual settling is normal. You’ll typically find a light film on nearby surfaces that wipes away in minutes, a world apart from the inches of gray dust that traditional demolition leaves on every horizontal surface in the house.
Certain conditions push more dust into the air even with good equipment running:
- Thick or double-layered thinset requires more grinding passes, and each pass is a chance for dust to escape the shroud.
- Glued-down floors, especially older adhesive-set tile over plywood, tend to shred rather than pop cleanly, scattering more fine debris.
- Cutting near walls or corners where the shroud can’t fully seal against the tool.
Crystalline silica is the real health concern behind all of this. OSHA’s guidance on crystalline silica identifies cutting, grinding, and demolishing silica-containing materials like tile and mortar as tasks requiring exposure controls, and the agency’s silica resource page lays out permissible exposure limits that professional crews are expected to follow. If your home has occupants with asthma, allergies, or small children, it’s reasonable to ask for extra containment barriers or a portable HEPA air scrubber running in adjacent rooms during the job.
Should You Hire a Pro or Try Dustless Removal Yourself?
The honest answer depends on job size, what’s under the tile, and who lives in the house. Here’s how to think it through:
- Hire a professional if the job exceeds roughly 200 to 300 square feet. Beyond that scale, the equipment and time investment for DIY dust control rarely pencils out against a contractor’s day rate.
- Hire a professional if silica exposure is a real concern. Old thinset, especially in homes built before the 1990s, can contain higher silica content, and OSHA’s exposure guidance exists precisely because uncontrolled grinding creates a measurable health risk.
- Hire a professional if the home is occupied during the work, particularly with young kids, elderly residents, or anyone with respiratory issues.
- Consider DIY only for small jobs (a single bathroom, a laundry room) where you can rent a HEPA vacuum, wear a properly fitted N95 or P100 respirator, and seal off the work area with plastic sheeting and a zippered doorway.
- Factor in equipment rental costs before assuming DIY is cheaper. A quality HEPA vacuum rental plus a shrouded grinder attachment can run close to what a half-day of professional labor costs, without the speed or cleanup that comes with an experienced crew.
If you’re on the fence, the deciding question is usually simple: how much do you value your time, your lungs, and not finding tile dust in your air ducts six months later?
What Should You Ask a Tile Removal Contractor Before Hiring?
A short phone call can tell you a lot about whether a contractor runs a real dust-controlled operation or just markets one. Ask directly about their HEPA equipment, how often filters get cleaned or replaced, and whether their crew has training in silica safety practices consistent with OSHA guidance. Ask what’s included in the quoted scope, specifically whether disposal, cleanup, and any necessary subfloor prep are part of the price or billed separately.
Watch for these red flags during the conversation:
- Reliance on standard shop vacs instead of HEPA-rated industrial units. A shop vac filter isn’t built to trap silica-fine particulate.
- Promises of “100% dust-free” results. As covered above, that claim isn’t physically accurate, and a contractor who leads with it either doesn’t understand the equipment or is overselling it.
- Bids noticeably below every other quote. Unusually cheap pricing often means corners get cut on equipment, disposal, or crew size.
- Reluctance to show proof of insurance or provide references. A legitimate contractor should hand this over without hesitation.
Verify claims by asking for before-and-after photos from recent jobs and, if possible, a reference you can call. A written scope of work that spells out square footage, disposal method, and a cleanup plan protects both sides if there’s a dispute later. Reviewing a contractor’s past project gallery before you commit gives you a sense of the quality and consistency to expect.
Pro Tip: Ask specifically, “What happens to the dust that does escape the shroud?” A confident contractor will describe their air scrubber setup and cleanup protocol without hesitating. A vague answer is a signal to keep shopping.
How Long Does a Dustless Tile Removal Job Take?
Setup and containment typically add one to three hours before any tile actually comes up, according to Remove Right’s project data, which covers sealing doorways, running vacuum hoses, and positioning air scrubbers. Active removal speed after that depends heavily on substrate and tool choice, with crews covering more ground on open floors than in cramped bathrooms.
A rough sequence for a single-day residential job:
- Setup and containment (one to three hours): sealing off the work zone, running vacuum lines, staging equipment.
- Active tile and thinset removal: the bulk of the workday, with speed depending on thinset thickness and floor layout.
- Vacuum and surface cleanup: a final pass with the HEPA vacuum across the substrate and surrounding surfaces.
- Equipment breakdown and haul-away: removing containment barriers and loading debris for disposal.
Before the crew arrives, clear the room of furniture and any valuables in adjoining spaces, and plan for HVAC vents in the work area to be temporarily sealed or covered. Larger rooms with fewer obstacles move faster per square foot than choppy layouts with lots of corners, closets, or built-ins.
What Happens After the Tile Comes Up?
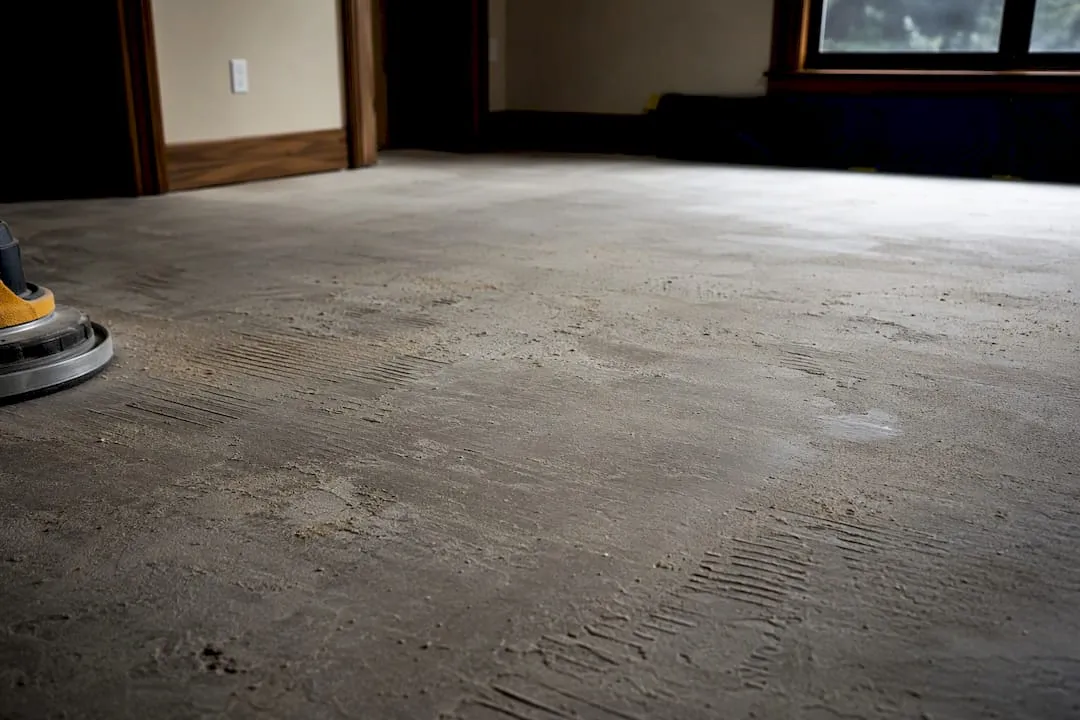
Expect a substrate with a light layer of fine dust that wipes away easily, not the heavy contamination that lingers for days after a traditional demolition. That’s the visible proof the source-capture system did its job.
Depending on the condition of the original installation, the concrete or plywood substrate underneath may need additional work before new flooring goes down. Leftover thinset ridges sometimes need grinding flat, and uneven spots may require a self-leveling compound before tile, hardwood, or luxury vinyl plank can go in cleanly.
Before the crew leaves, get the scope of work, disposal confirmation, and any warranty terms in writing. A reputable contractor will document what was removed, how debris was hauled away, and what condition the substrate was left in, which matters if you’re hiring a separate team for flooring installation down the line.
What Warranty Should You Expect From a Dust Removal Contractor?
Warranty terms for tile removal work vary more than most homeowners expect, mostly because “removal” is a demolition service, not an installation with a manufacturer-backed product warranty. Most contractors offer a workmanship guarantee covering the condition of the substrate they leave behind, typically promising the surface is clean, level, and free of leftover debris or adhesive ridges that would interfere with new flooring.
A separate but related guarantee covers cleanup itself. This is where dust-controlled contractors often distinguish themselves from traditional demolition crews, since the whole value proposition rests on leaving the home cleaner than a sledgehammer approach would. Ask specifically whether the guarantee includes a return visit if dust or debris turns up in adjoining rooms after the fact.
If the same company is also handling your replacement flooring, ask how the removal warranty interacts with the installation warranty. A contractor who bundles removal, subfloor prep, and new flooring under one scope of work has a much easier time standing behind the whole job, since there’s no finger pointing between separate companies about whose work caused a problem. Get every guarantee spelled out in writing before signing, including what triggers a covered return visit and what counts as normal post-removal residue versus a legitimate cleanup failure.
What Payment Options Do Tile Removal Contractors Accept?
Most remodeling contractors accept standard payment methods: check, major credit cards, and bank transfers, with many now offering online payment portals for convenience. For larger jobs that combine removal with new flooring installation, expect a deposit at signing followed by a progress payment and a final payment on completion, rather than paying the full amount upfront.
Financing has become common for remodeling projects that stretch beyond simple tile removal into full flooring replacement or broader renovation work. Many contractors partner with third-party financing companies that offer fixed monthly payment plans, letting homeowners spread the cost of a larger project over several months or years instead of paying in one lump sum. If financing matters to your budget, ask about it during the estimate conversation rather than after the contract is signed, since approval timelines can affect your project start date.
Always get payment terms in writing as part of your contract, including deposit percentage, progress payment triggers, and what happens if the project scope changes mid-job. A contractor who pushes for full payment upfront before any work begins is worth a second look.
How an Integrated Remodeler Approaches Dust Control
Removal is rarely the whole job. Most homeowners calling about tile removal are really planning a new floor, which means the real question isn’t just “who can pull up my old tile” but “who can take this from demo to finished floor without three different companies pointing fingers at each other.” Solution Team Remodeling handles both ends of that job, pairing floor removal with tile installation, hardwood, laminate, and luxury vinyl plank work, which cuts out the handoff gaps where hidden costs and scheduling conflicts tend to hide. When one team owns removal, subfloor prep, and installation, there’s no ambiguity about who’s responsible if the substrate needs extra leveling before new flooring goes down. That continuity is worth more than it sounds like on paper.
— Vlad
Get an Estimate for Dust-Controlled Tile Removal
A full-service remodeling team handles tile and surface renovations, floor removal, subfloor prep, and replacement flooring as one connected process, not a series of separate contractors you have to coordinate yourself. That matters because the biggest hidden cost in most remodeling projects isn’t the removal itself. It’s the gap between whoever tears out the old floor and whoever installs the new one, where surprises about substrate condition or timeline usually surface.

A free estimate from a remodeling contractor typically includes a transparent scope of work, a realistic timeline, and pricing that accounts for your specific substrate and thinset condition rather than a generic per-square-foot guess. If you’re weighing whether to remove tile yourself or want a team that can carry the project from demo through finished flooring, request a free estimate on the main services page and get a scope you can actually plan around.
Sources
- OSHA - Crystalline Silica
- Is dustless tile removal really dust-free? — DustKingz
- Remove Right — Dustless floor removal
FAQ
How much does dustless tile removal cost?
Most homeowners pay between $3.00 and $7.00 per square foot for professional dust-controlled tile removal, with thinset thickness, access, and disposal fees driving the final number. Bathrooms, stairs, and heavily bonded tile tend to land at the higher end of that range.
Does dust-free tile removal really work?
Yes, in the sense that a properly run HEPA source-capture system dramatically reduces airborne dust compared to traditional demolition. It’s not literally dust-free, though. Industry sources are clear that some residual dust is normal even with the best equipment and crew discipline.
What is the best dust-free thinset removal tool?
HEPA-shrouded chipping hammers and grinders paired with an industrial vacuum rated for fine particulate are the standard tools for thinset removal. Vacuums with high CFM ratings and 0.3-micron filtration outperform household shop vacs and consumer-grade equipment for this job.
How much does Home Depot charge to remove tile?
Home Depot doesn’t perform tile removal directly. It typically connects customers with third-party contractors or partner installation services, and pricing varies by local provider rather than a fixed company rate. Getting a direct estimate from a dust-controlled removal specialist, like Solution Team Remodeling, usually gives a clearer and more accurate price than a general home improvement retailer’s referral network.
